Auburn Blazer - Muslin 2
This is really more of a test garment than a muslin - I made a fully interfaced and lined jacket, with pockets, shoulder pads, and sleeve heads. I also put in a bound button hole for practice. It's actually reasonably wearable, except for the fact that it's white and all my winter clothes are dark. But I could see wearing it over a summer dress. I got through cutting everything out and fusing the interfacing bay in May, and then stalled out until practically Thanksgiving.
And then when I went to put everything together my sewing machine needed work - apparently all the internal grease had seized and needed to be cleaned out. I ended up taking it to my local sewing shop (Pintuck and Purl in North Hampton NH) and they were able to service it. And they sold me a Bernette - the 35, which is the more advanced mechanical version. I was able to put everything together with it, and pick up my Pfaff a few weeks later as good as new.
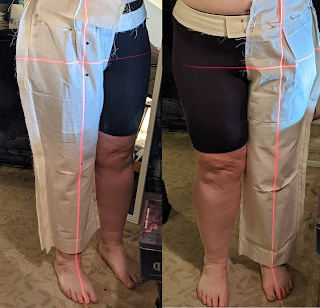
All of the changes from my original muslin carried forward - 2" swayback, 1/4" shoulder slope, 1/4" side seam reduction, 1/4" upper back reduction. I didn't need to do a forward shoulder on this one, since Cashmerette patterns are drafted with a more forward shoulder than many other companies already. It fits really well, and I still have decent arm mobility.
I followed the instructions as written for the welt pocket on one side, and did a slightly modified version on the other. As written it has you make a welt with the ends seamed shut, and hand stitch it to the side of the jacket. I also made one with the welt unsewn, and tucked the welt ends through to the interior and stitched them down at the triangle "ears" from opening the pocket. I didn't get the welt width quite right, so it's a little bit puckered, but I think it's the better method. It means that the portion of the welt that's visible is only two layers, instead of having the seam allowance adding extra bulk at each end. I will say, this is the one part where I missed my Pfaff - the Bernette only adjusts the needle position to one side instead of both, so I struggled to get the stitching line right where I wanted it. I think on the final version I'll cut the welts extra long and trim them after, that way there won't be any faffing about with getting it in exactly the right place.
I did bag the lining at the facing to lining seam rather than the facing to jacket body seam, which is definitely the way to go. It gives much better control of the turn of the cloth at the lapel than sewing the facings to the lining first.
 |
| Close up of the lapel and princess seam - not perfect but pretty good. |
 |
| Back view of the blazer. I'm not sure why the vent is swinging open here. |
 |
| Front view with the fronts open showing a cream lining |
 |
| It has pockets! |
Comments
Post a Comment