Meriam Trousers
.jpg) |
| Trousers that fit! |
I am using the Meriam Trouser pattern from Cashmerette. As is typical with their patterns, it is excellent. The pant leg is balanced properly at the knee, and all the pieces match up nicely. The instructions are very good, the welt pocket and fly particularly. And they even provide a "full bum" back piece, which is a godsend for some one shaped like me. All in all, highly recommend.
Fitting
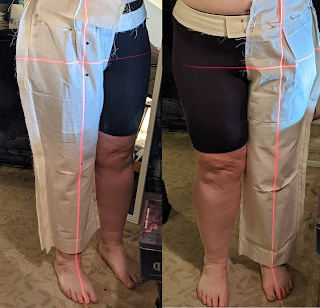
I used the Top-Down-Center-Out method for fitting, and had good luck with it. Though I did end up with a waist too big for the waist band, that was very much a me issue. I somehow managed to skip the basting step in the top down center out method, so I didn't get everything quite right with my new waistline. I'll go back and baste it, and pin trace the seams to make sure I got it right. I ended up decreasing the rise by 1" at the back and 3" at the front - this sets the waistband fairly low, around the top of my hip bones. This tends to be where pants want to fit on me, since it is a place that is fairly stable when I move rather than further up on my waist which is more squishy. I also find it more comfortable - having a relatively rigid waistband or belt around my pelvis is OK but having something rigid around my middle is less so.
I also didn't bring the hips in enough horizontally originally - I had to take in about an extra 1/2" from the side seams from the waist line, and then dropped that vertically down to just below the pockets, basically cutting off the hip curve. I'm pretty straight up and down (at least from the front!) between upper thigh and hip, so the pattern had more curve than I needed. I also adjusted the center grain line at the hip by 3/4" at the front and 1" at the back, to set the center grain correctly for my body. I talked about this in my original fitting post.
The top down center out method is great, though I do think it has some limitations for extra butt depth like I have (and a tilted pelvis), since it does not have you change the crotch curve at all. I think there's some more instructions in the Threads article on how to choose the correct size, including going up in size for larger crotch depth even if you don't need it for the hip circumference. Which is interesting, and might actually have fixed my grain line placement issue - with a larger size I would need to take out additional width at the outside seam since my crotch depth is proportionally larger than my hip circumference, which would effectively have moved the center grain line/balance line closer to the center front/back. Huh. Something to experiment with.
Sewing
These went together really well. You do all the fiddly parts up front, including darts, welt pockets and front pockets, and the fly. Then the leg seams and waist band are easy. I did have one issue with the instructions, where it is not entirely clear how to anchor the top facing for the welt pockets. I posted to the Cashmerette facebook page, and Jenny noted that the instructions were deliberately left a little vague since there are a couple of options on how to anchor the pockets. I ended up flipping the top of the pant leg down and sewing through the welt seam allowance into the facing, closing up the to of the pocket. I'm happy with that solution, though the way the pockets are drafted they do not extend up to anchor in the waist band.
 |
| Welt pocket magic! |
I thought about doing a pocket stay to run between the top of the pocket and the waistband to prevent any distortion when the pocket is used, but ended up leaving it as designed. I think that was a mistake - in the future I'll add a stay or extend the pocket bag up to be caught in the waistband. The welt facing has a tendency to flip down instead of lying flush, which makes the back pocket area not sit as nicely as it might. I'll probably either top stitch along the top of the pocket or anchor the facing up to the dart or waistband by hand.
I ended up with too much length around the waistline when I was ready to put the waist band in. This was annoying and entirely my fault - I didn't pay close enough attention to the final length of the back pieces in comparison to the waistband. I was able to salvage the situation by taking 1/2" out of the side seams and center back seam, and tightening the darts up a bit.
Final Thoughts
These are great pants. I'm a little annoyed by the waist band, since it's entirely my fault and it could have been perfect if I'd been paying more attention. But I'll fix it on the next pair, these were intended to be a wearable muslin/test garment anyway, so having something that fits as well as they do is really nice. Pattern was well written and the instructions are quite good. I will definitely be making more pants.

Comments
Post a Comment