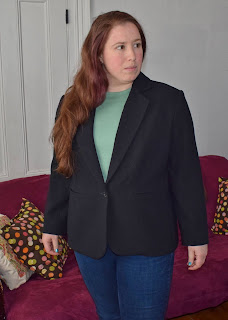
It's done!
 |
| Final completed blazer |
I spent most of the month of January working on this, cutting and interfacing and sewing. I did the cutting out in sections, starting with the interfacing and then the main fabric. I waited to cut the lining until I was ready to sew it, following the advice of another sewer who suggested that since there is so much cutting for this project it's helpful to not do it all at the same time. That did work well for me - there is a huge number of pieces to cut out and keep track of. I traced the pieces onto the fabric, pinning the layers together inside the lines to ensure the two sides were the same. Pattern weights were a combination of mason jar pickling weights and a couple of cans.
 |
| Cutting out the interfacing with pattern weights and red chalk |
 |
| Cutting out the main fabric - pinning the fabric layers together and more tracing |
 |
| Jacket torso put together on the dress form, with the lapels clipped open to help shape the roll line |
The sewing process went pretty smoothly, though it did take a while. I had pretty good success setting the welt pockets and sewing all the darts (including the horizontal bust dart included on the D cup patter piece). The sleeves went together well, I did hand baste them into the jacket body as directed before machine stitching, and yes it is actually worth it. The collar and lapel are not 100% perfect, but they're pretty good.
Sewing the lining was easy and quick, though I did cut the wider back piece for both and then carefully trimmed the one side down once I was entirely sure which side needed to be narrower for the back vent - it would have been wildly annoying to screw that up! Bagging the lining is freaking magic. You take this octopus tangle of body and lining and far to many sleeves and then turn it right way out and the lining sits nicely inside the finished jacket. I still don't really understand how it works.
 |
| Almost completed jacket, with silk basting at pockets and lapel |
I actually finished the jacket on January 24th, but then I adopted a puppy the next week so I didn't actually get around to the final pressing and de-cat hairing and taking pictures until April 3rd. Before the final pressing the back vent had a tendency to stand open, I think just because the fabric was flaring. I fixed it by pinning the vent closed over a tailors ham and steaming it, then letting it cool. It seems to have worked well!
 |
| Back view of the completed blazer |
 |
| Side front view of the blazer - it has pockets! |
 |
| Open blazer showing the teal lining fabric |
Overall I'm really happy with how it turned out. The fit is pretty excellent - I'm glad I did as much work to get it to fit correctly as I did. There is maybe a bit of extra room at the upper back and around the chest, but I can move my arms around easily and I wouldn't want to over fit it. All in all, it's a hugely successful project. And now that Cashmerette has released their blazer I might need to make another!


Comments
Post a Comment