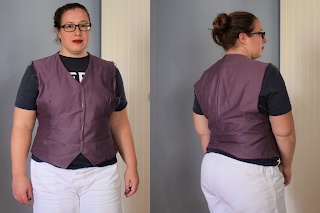
Wahid Waistcoat Fitting
A while back I decided that it might be fun to add a waistcoat/vest type garment to my wardrobe. Something to wear over a long sleeve t-shirt to dress up and add warmth for work. It turned out to be a bit of a fitting journey, since the pattern I started with (from freesewing.org) was drafted for a masculine figure. There are a couple of adjustments I needed to make to get it to fit me correctly (slight understatement).
Freesewing.org is a pretty excellent resource, with several different patterns all drafted to your measurements. They have patterns drafted for figures with breasts and without, though not every pattern is available for every body. There are some limitations, a design that's been drafted for a masculine figure may not do so well on a body with breasts, and there are some combinations of measurements that will cause the generator to fail. I ran into that with a basic body block - when I put in my actual chest and arm measurements it threw an error code. I think the issue was that my bicep measurement was outside of what it expected for the way the sleeve cap and armscye is drafted. I was able to use that pattern, I just had to manually adjust the sleeve pattern to add width so it would fit my arm.
 |
| First muslin - the extra deep armholes are visible |
The first trial (made in an old sheet) showed that the arm holes were much to deep, but otherwise the fit was pretty reasonable. I think the arm hole issue might be a pattern block thing - because I have boobs and the pattern is made for a figure without, it calculated the armholes based on the chest measurement and was too large. I probably would have gotten a much more reasonable size if I'd started with my high bust and then done a full bust adjustment for the breasts, but this worked. I don't know that it would have been less work over all. If I had been paying more attention I might have done a few more fixes with this one, but I didn't really think about it so the next trial just has the modified armhole height. Also the project then hibernated for a few months before I got around to making the next trial.
The second muslin I made with just the armholes raised. It has a couple of issues - the shoulders aren't sloped enough, and there are wrinkles around the front neck. It also needs a swayback adjustment. I originally thought the wrinkles at the neck were due to the shoulders being too square, but when I took out the stitching at the center back neck they disappeared (though the shoulders were still too square). So I added about a half an inch and dropped the center back neck by about a half an inch. I then did a swayback adjustment, drooping the center back by an inch and a half while leaving the shoulder the same. I made this adjustment by pivoting at the shoulder point, using the excellent instructions from Sewing with Nancy. |
| Trial 3 - Back modifications. |
The next trial I made the adjustments to the back and left the front alone, so I just ripped the back panels off and sewed in a new one. I did not change the shoulder slope here, and it turned out that the adjustment was needed - I wasn't sure how much was fitting at the neck and how much was actual shoulder slope, so I didn't want to make both changes at once and not be able to tell what was going on. I also apparently didn't do enough of a sway back adjustment, because I've still got horizontal wrinkles across the back. With the shoulder and the back pinned the fit is pretty good.
 |
| Trial 4 - All the adjustments in one! |
The fourth muslin was all the adjustments in one! I made all of the shoulder angle change to the front of the shoulder, since I needed to move the shoulder seam forward to where my shoulder point actually is. I also adjusted the darts on the front and the back, and did the last swayback adjustment. I did this one by taking out about another inch at the center back, rather than doing it up at the shoulder again, since I was also making a shoulder slope adjustment. It probably would have been fine to do the shoulder version but I was a bit nervous about combining too many changes at one point. There's still a bit of rippling in the muslin, but it's a much stiffer fabric and tends to magnify issues. Also it's so much better than the original I'm happy.
All stacked up the back pattern got rather a lot of change, and the front pattern a bit too. The last bit of adjustment was shortening the front shoulder seam - it turns out when you angle a seam it gets longer. So I pin tracked it onto the back shoulder by aligning the outside corner and following the seams to the inside, and then angled the neckline to meet. It was only off by less than half an inch, but it was enough to be annoying especially since it will affect both the front piece and the facing.
 |
| Pattern pieces laid out showing the adjustments |
I do need to figure out where the pockets should go on my revised garment but that shouldn't be too hard. This was a more involved process than completely necessary, but I'm pretty pleased with how it turned out. And I learned a whole lot for the next time I need to make changes - I have dreams of a blazer and this was good practice for the alterations I'll need to make for that.


Comments
Post a Comment