Almost Perfect, but...
What to do when someone has written a pattern that I like, but don't quite love? Well, a lot of math and a bit of revisions. The pattern in question? Artisan by Elizabeth Felgate. I love the sweater - it's cozy, with squishy garter stitch and innovative construction. But... I have a fair amount of depth front to back, so boat necks don't fit me very well. And I wanted a shoulder strap. And I was probably going to use a different yarn than the specification so who knows if my gauge is going to be anything like what the pattern says.
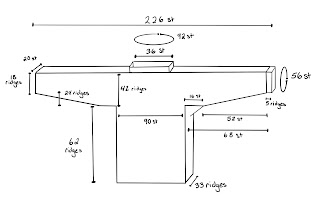 |
| Schematic of my revised Artisan |
So, Math. Lots of it. To begin with I knit a giant gauge swatch (seriously, it's almost a foot square) and marked out a large square with red yarn, then ran it through the washing machine and dried it flat. Marking the square before washing means that the gauge is measured over whole stitches, which is more accurate than measuring after the fact and trying to estimate partial stitches (also it allows the difference between pre-wash and post-wash gauge to be accurately measured). This is a trick from Knit to Flatter I think.
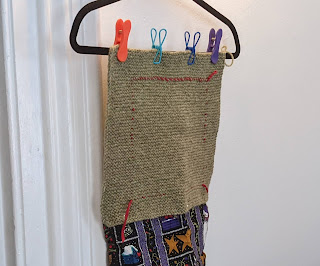 |
| Gauge swatch marked for size and hung to settle |
Size: 39 stitches x 38 garter ridges (79 rows)
Pre Wash: 8 5/8" wide x 8" tall
Post Wash: 8 1/4" wide x 7 1/4" tall
Gauge: 4.73 st/inch x 5.24 ridges/inch
The swatch shrank more vertically than horizontally, as the garter ridges pulled into each other. This isn't hugely surprising based on how garter stitch behaves. I then hung it and pinned a bit of fabric to the bottom to see if the garter rows would stretch out much during wear. After 4 hours or so the square measured 7 3/4" tall. So some, but not a huge amount.
 |
| Schematic of the sweater in percentages and inches |
Now for the plan, and the math. I'm using some standard drop shoulder gansey percentage charts, to figure out how big the arms should be at the shoulder and wrist and how wide the neckline. And then went from there. I started casting on across the shoulders and down the arms, then knitted straight for the wrist dimension, and then started short rows to shape the sleeve increases. Then I cast the sleeve stitches off onto scrap yarn (this will be pulled out later and the sleeves grafted together or bound off) and now I'm knitting back and forth across the center body panel. Once that's done I'll repeat for the other side, then attach the two panels together and knit the side panels vertically with a pointed gusset under the arms. Last I'll knit up the arms for the shoulder straps, and finish with the sleeve bands and collar in the round (or possibly back and forth and then sewn, since garter is easier flat). We'll see how it turns out, but currently I'm pretty pleased with how it's coming together.

Comments
Post a Comment